From ports to subdomains — Pi-hole + Traefik
Part 2 of the homelab series: replacing port-based access with clean subdomain routing using Pi-hole for DNS and Traefik as a reverse proxy.
At the end of the last post, I had a Raspberry Pi running Docker with Tailscale installed and I could reach any service from anywhere using addresses like http://kaos:8080. But as soon as I started adding more services, the cracks appeared: kaos:8080 for one thing, kaos:9000 for another etc. I had to keep note of which port was which. This setup quickly became a liability.
What I wanted was to reach services at proper addresses: traefik.kaoshome.dev, portainer.kaoshome.dev, homeassistant.kaoshome.dev. Clean, memorable and self-documenting.
Getting there requires two things working simultaneously:
- DNS: something that resolves
traefik.kaoshome.devto my Pi’s IP - A reverse proxy: something on the Pi that receives that request and routes it to the right container based on the hostname
I decided to use Pi-hole and Traefik for that. Let me walk through what each does and how I set them up.
Pi-hole: DNS server and ad-blocker
Pi-hole is primarily known as a network-wide ad blocker. It acts as a DNS server for your network: all DNS queries from your devices go through it and it drops queries for known ad and tracking domains before any connection is made. No browser extension or per-device configuration is needed.
But what makes it essential for this setup is the DNS customization it exposes through its embedded
dnsmasq
engine. dnsmasq lets me define resolution rules at the DNS level. I can tell Pi-hole: “any incoming query for *.kaoshome.dev you respond with this IP.” One rule covers every subdomain I’ll ever create.
I run Pi-hole bare-metal on the Pi, not in Docker. Same reasoning as Tailscale: DNS is infrastructure. If Docker has a problem, I don’t want DNS to go down with it. Running it on the host keeps it independent.
Installing Pi-hole
curl -sSL https://install.pi-hole.net | bash
Follow the installer prompts. When asked to pick an upstream DNS provider, I went with Cloudflare (1.1.1.1), but any public resolver works.
Allowing queries from all origins
By default, Pi-hole only responds to DNS queries from its own local subnet. Since Tailscale clients arrive on the 100.x.x.x range — not my LAN subnet — I need Pi-hole to answer those too.
In the Pi-hole admin dashboard: Settings → DNS → Interface settings → Permit all origins.
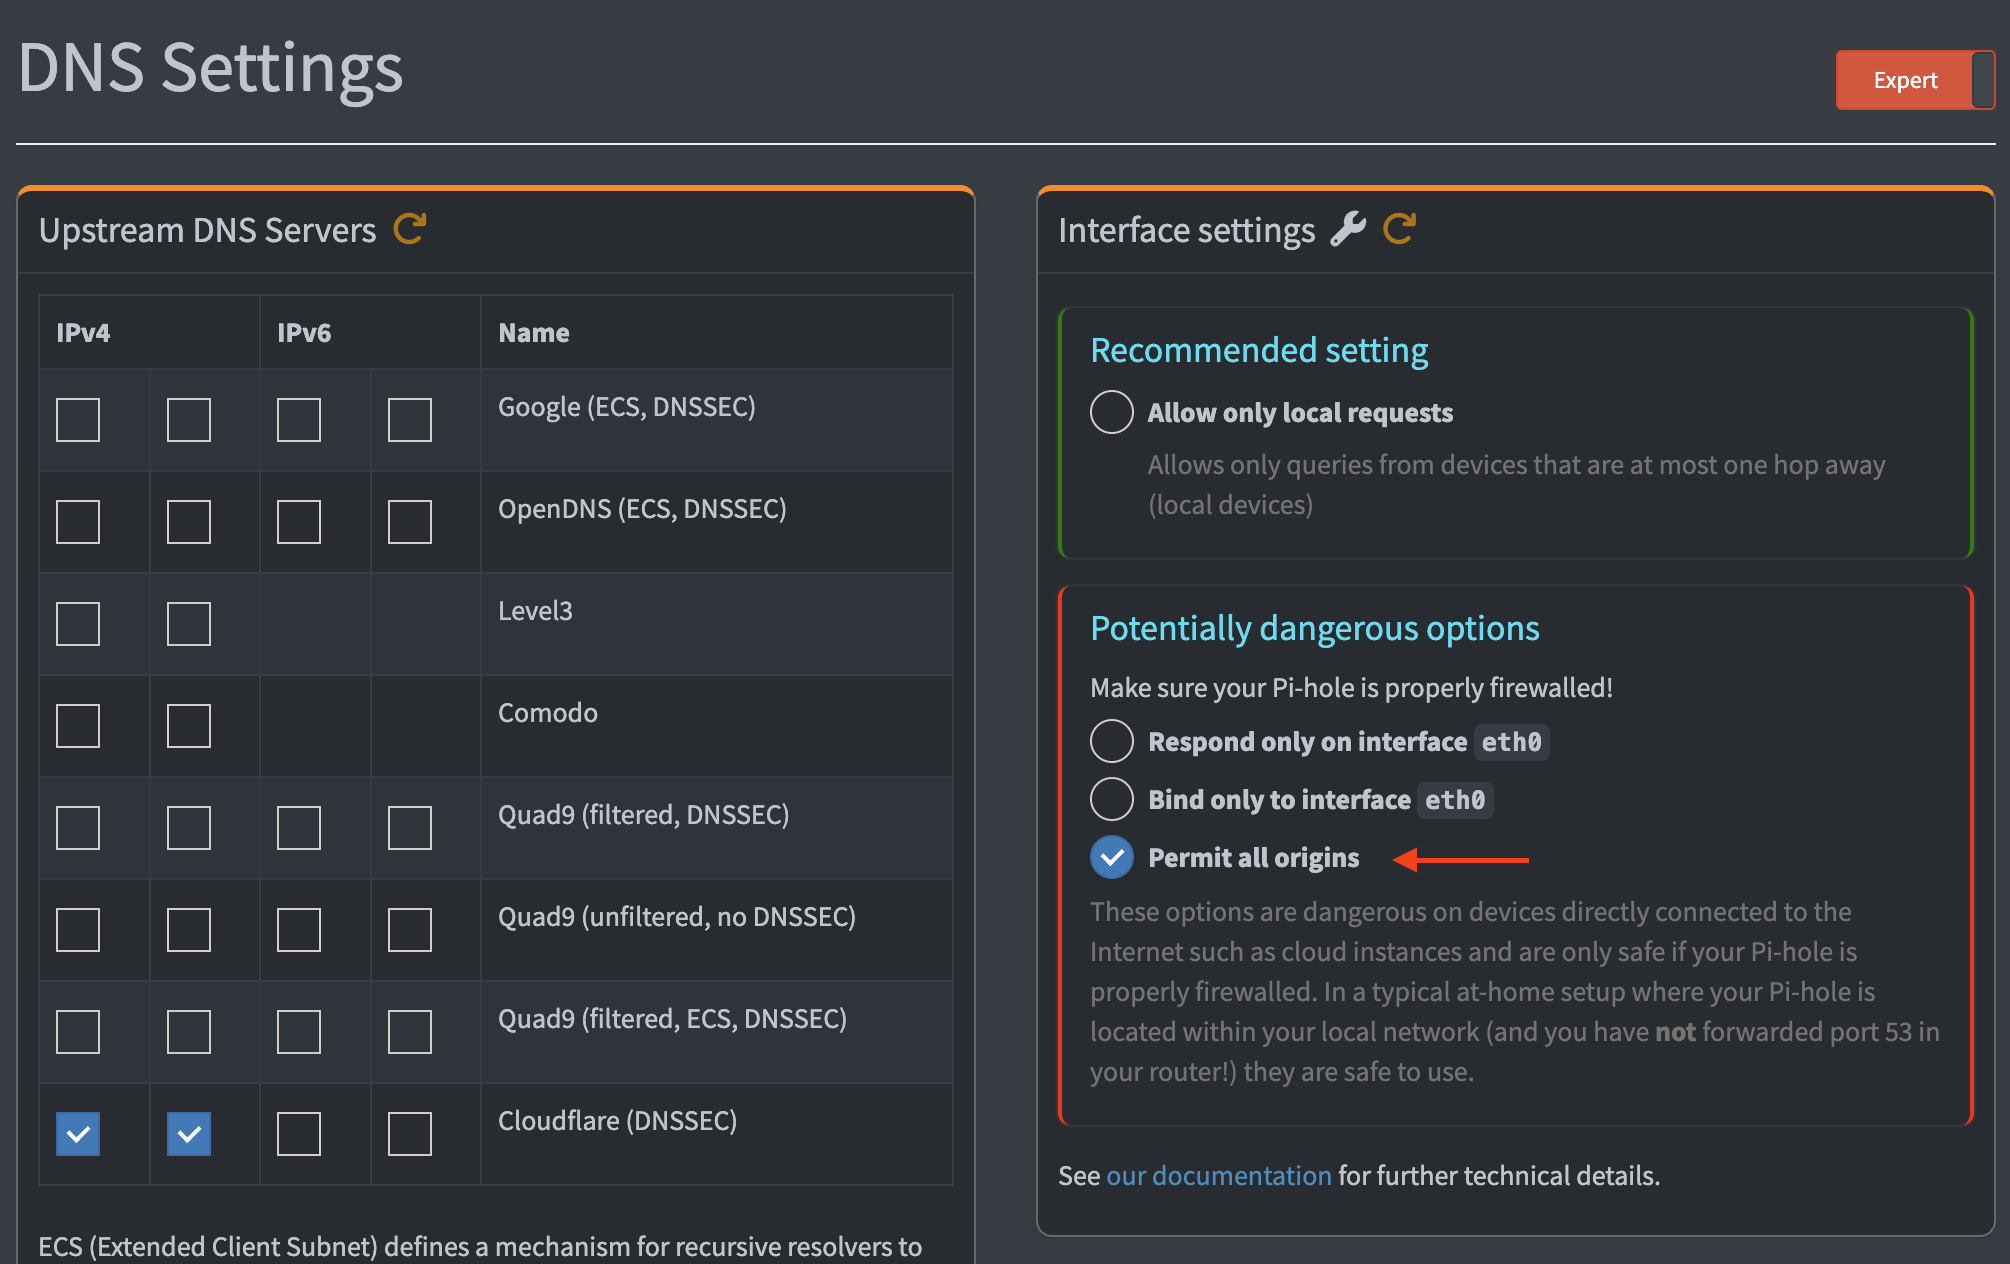
Make sure that the slider at the top says ’expert’. If it’s ‘basic’, ‘Interface settings’ won’t be displayed.
Enabling custom dnsmasq files
Pi-hole runs dnsmasq internally, but by default it doesn’t load custom config files. Edit /etc/pihole/pihole.toml and set:
etc_dnsmasq_d=true
This tells Pi-hole to read additional dnsmasq config files from /etc/dnsmasq.d/, which is where I’ll put the wildcard rule.
The wildcard DNS rule
Create the file /etc/dnsmasq.d/02-kaos.conf with this single line:
address=/.kaoshome.dev/<raspberry-tailscale-ip>
Replace <raspberry-tailscale-ip> with the Pi’s actual Tailscale IP (the 100.x.x.x address visible in the Tailscale admin console under Machines).
This tells dnsmasq to resolve every subdomain of kaoshome.dev to that IP. traefik.kaoshome.dev, portainer.kaoshome.dev, anything.kaoshome.dev — they all point to the Pi. The leading dot in /.kaoshome.dev/ is what makes it a wildcard. Any new service I add later just works, no DNS update required.
Restart Pi-hole’s DNS resolver to pick up the new file:
sudo systemctl restart pihole-FTL
Setting Pi-hole as the Tailscale global DNS server
Pi-hole is running and knows how to resolve *.kaoshome.dev. But my other devices still need to know to ask Pi-hole instead of their default DNS. In the Tailscale admin console, under DNS, I added the Pi’s Tailscale IP as a global nameserver and toggled Override DNS servers on.
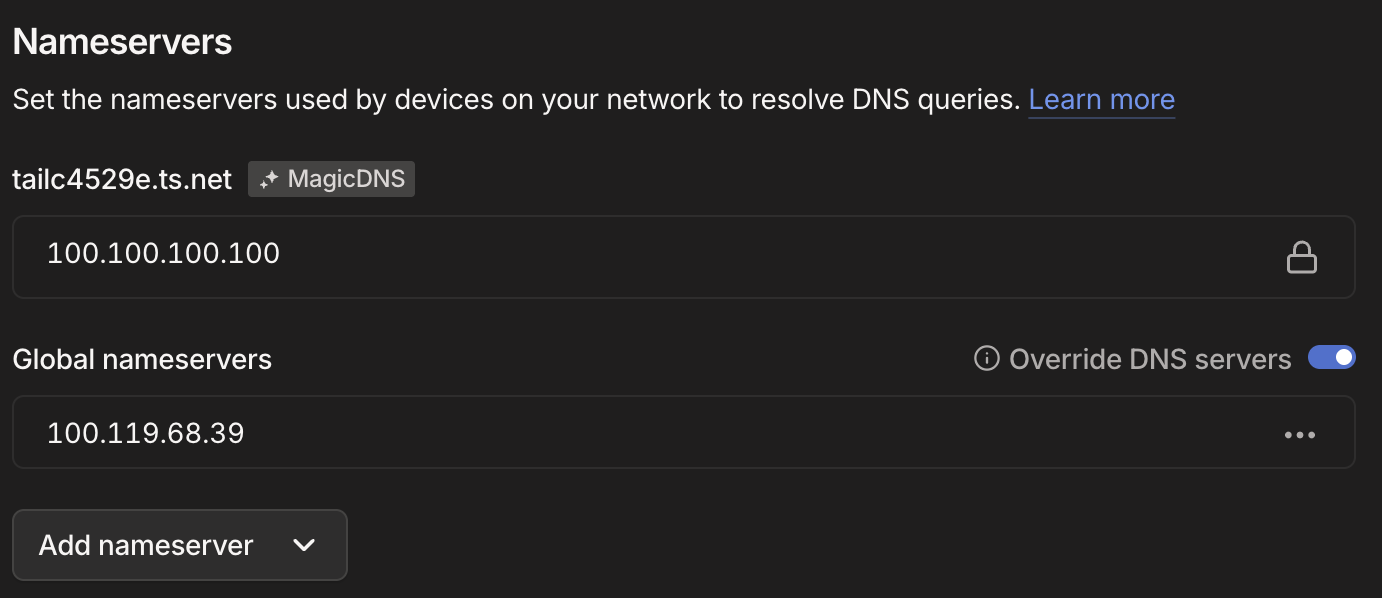
Setting Pi-hole as the global DNS resolver for the entire tailnet. Here, 100.119.68.39 is my Pi’s address on my tailnet.
This pushes Pi-hole as the DNS resolver to every device on the tailnet. All DNS queries — not just for *.kaoshome.dev, but for everything — now go through Pi-hole. That’s where the ad-blocking comes in: every tailnet device gets network-wide ad-blocking.
Note: This post is not about how to use Pi-hole as an ad-blocker but I highly recommend doing it too. You can follow this tutorial for more instructions.
Verifying DNS resolution
At this point, any device on the tailnet should resolve traefik.kaoshome.dev to the Pi’s Tailscale IP:
dig traefik.kaoshome.dev
You should see the Pi’s 100.x.x.x address in the answer. If you do, the DNS layer is working. But there’s nothing listening on the Pi yet to handle that request. That’s Traefik’s job.
Traefik: reverse proxy and router
A reverse proxy sits in front of your services and forwards incoming requests to the right one based on information in the request. In our case, the Host header. When a request arrives for traefik.kaoshome.dev, Traefik reads the hostname and routes to the dashboard. When it sees portainer.kaoshome.dev, it goes to Portainer. One port, many services, each at their own address.
Setting up Traefik
Here’s the docker-compose.yaml for the initial HTTP setup:
services:
  traefik:
    image: traefik:v3.6
    container_name: traefik
    restart: unless-stopped
    security_opt:
      - no-new-privileges:true
    command:
      - '--entrypoints.web.address=:80'
      - '--providers.docker=false'
      - '--providers.file.directory=/dynamic'
      - '--providers.file.watch=true'
      - '--api.dashboard=true'
      - '--log.level=INFO'
      - '--accesslog=true'
    ports:
      - '80:80'
    volumes:
      - ./dynamic:/dynamic
    networks:
      - traefik

networks:
  traefik:
    name: traefik
    driver: bridge
A few things worth calling out:
--providers.docker=false: Traefik can discover routing rules automatically by reading Docker labels on containers. I disabled this. Instead, I use file-based configuration. More on why below.
--providers.file.directory=/dynamic: Traefik loads routing rules from YAML files in the /dynamic folder. The volume mount ./dynamic:/dynamic maps a local dynamic/ directory (sitting alongside the docker-compose.yaml) into the container. With --providers.file.watch=true, Traefik hot-reloads when those files change, no container restart needed.
The traefik Docker network: Every container that Traefik needs to route to must be on this network. Traefik reaches containers by their container name, which only works when they share a network. I create this network once and attach every service to it.
Start Traefik:
docker compose up -d
Why file-based config instead of Docker labels
Many Traefik guides configure routing through Docker labels on each service:
labels:
  - "traefik.http.routers.myapp.rule=Host(`myapp.kaoshome.dev`)"
I also started like this but eventually decided to move away from it. With labels, routing configuration is scattered across every docker-compose.yaml in the project. To understand the full picture of what Traefik is routing, you’d have to read every service file. With file-based config, all routing rules live in one place — the dynamic/ directory — and it’s easy to audit and version control.
There’s also a security angle: Docker label discovery requires Traefik to mount the Docker socket (/var/run/docker.sock), which grants significant control over the host. File-based config doesn’t need it.
Finally, the file-based approach has the benefit of live-reload: every update I make to the configuration file will be immediately tracked by Traefik. If you decide to use Docker labels, you have to restart the container after each update.
Routing configuration
Each file in traefik/dynamic/ defines routers, services, and middlewares. Here’s dynamic/traefik-dashboard.yml:
http:
  middlewares:
    dashboard-auth:
      basicAuth:
        users:
          - "admin:<hashed-password>"

  routers:
    traefik-dashboard:
      rule: "Host(`traefik.kaoshome.dev`)"
      entryPoints:
        - web
      service: api@internal
      middlewares:
        - dashboard-auth
Routers match incoming requests. The rule field defines the matching condition. Host(traefik.kaoshome.dev) matches any request where the Host header equals that value. entryPoints: [web] means this router only applies to HTTP traffic on port 80. service tells Traefik where to forward the matched request.
api@internal is a special built-in Traefik service pointing to its own dashboard. For external containers, you’d define a services block pointing to http://container-name:port instead (as we’ll see later).
Middlewares transform requests before they reach the service. basicAuth adds HTTP basic authentication — requests without valid credentials are rejected. The password must be bcrypt-hashed. Generate one with:
htpasswd -nb admin yourpassword
Paste the output into the users list. The format is username:hashedpassword.
How it all connects
The full journey of a request to http://traefik.kaoshome.dev:
Browser asks: "what's the IP of traefik.kaoshome.dev?"
  → Pi-hole answers: 100.x.x.x (the Pi's Tailscale IP)

Browser sends HTTP GET to 100.x.x.x:80, Host: traefik.kaoshome.dev
  → Tailscale delivers the packet to the Pi over the encrypted tunnel

Traefik is listening on port 80
  → reads Host: traefik.kaoshome.dev
  → finds a matching router
  → applies the dashboard-auth middleware
  → forwards to api@internal

Dashboard responds
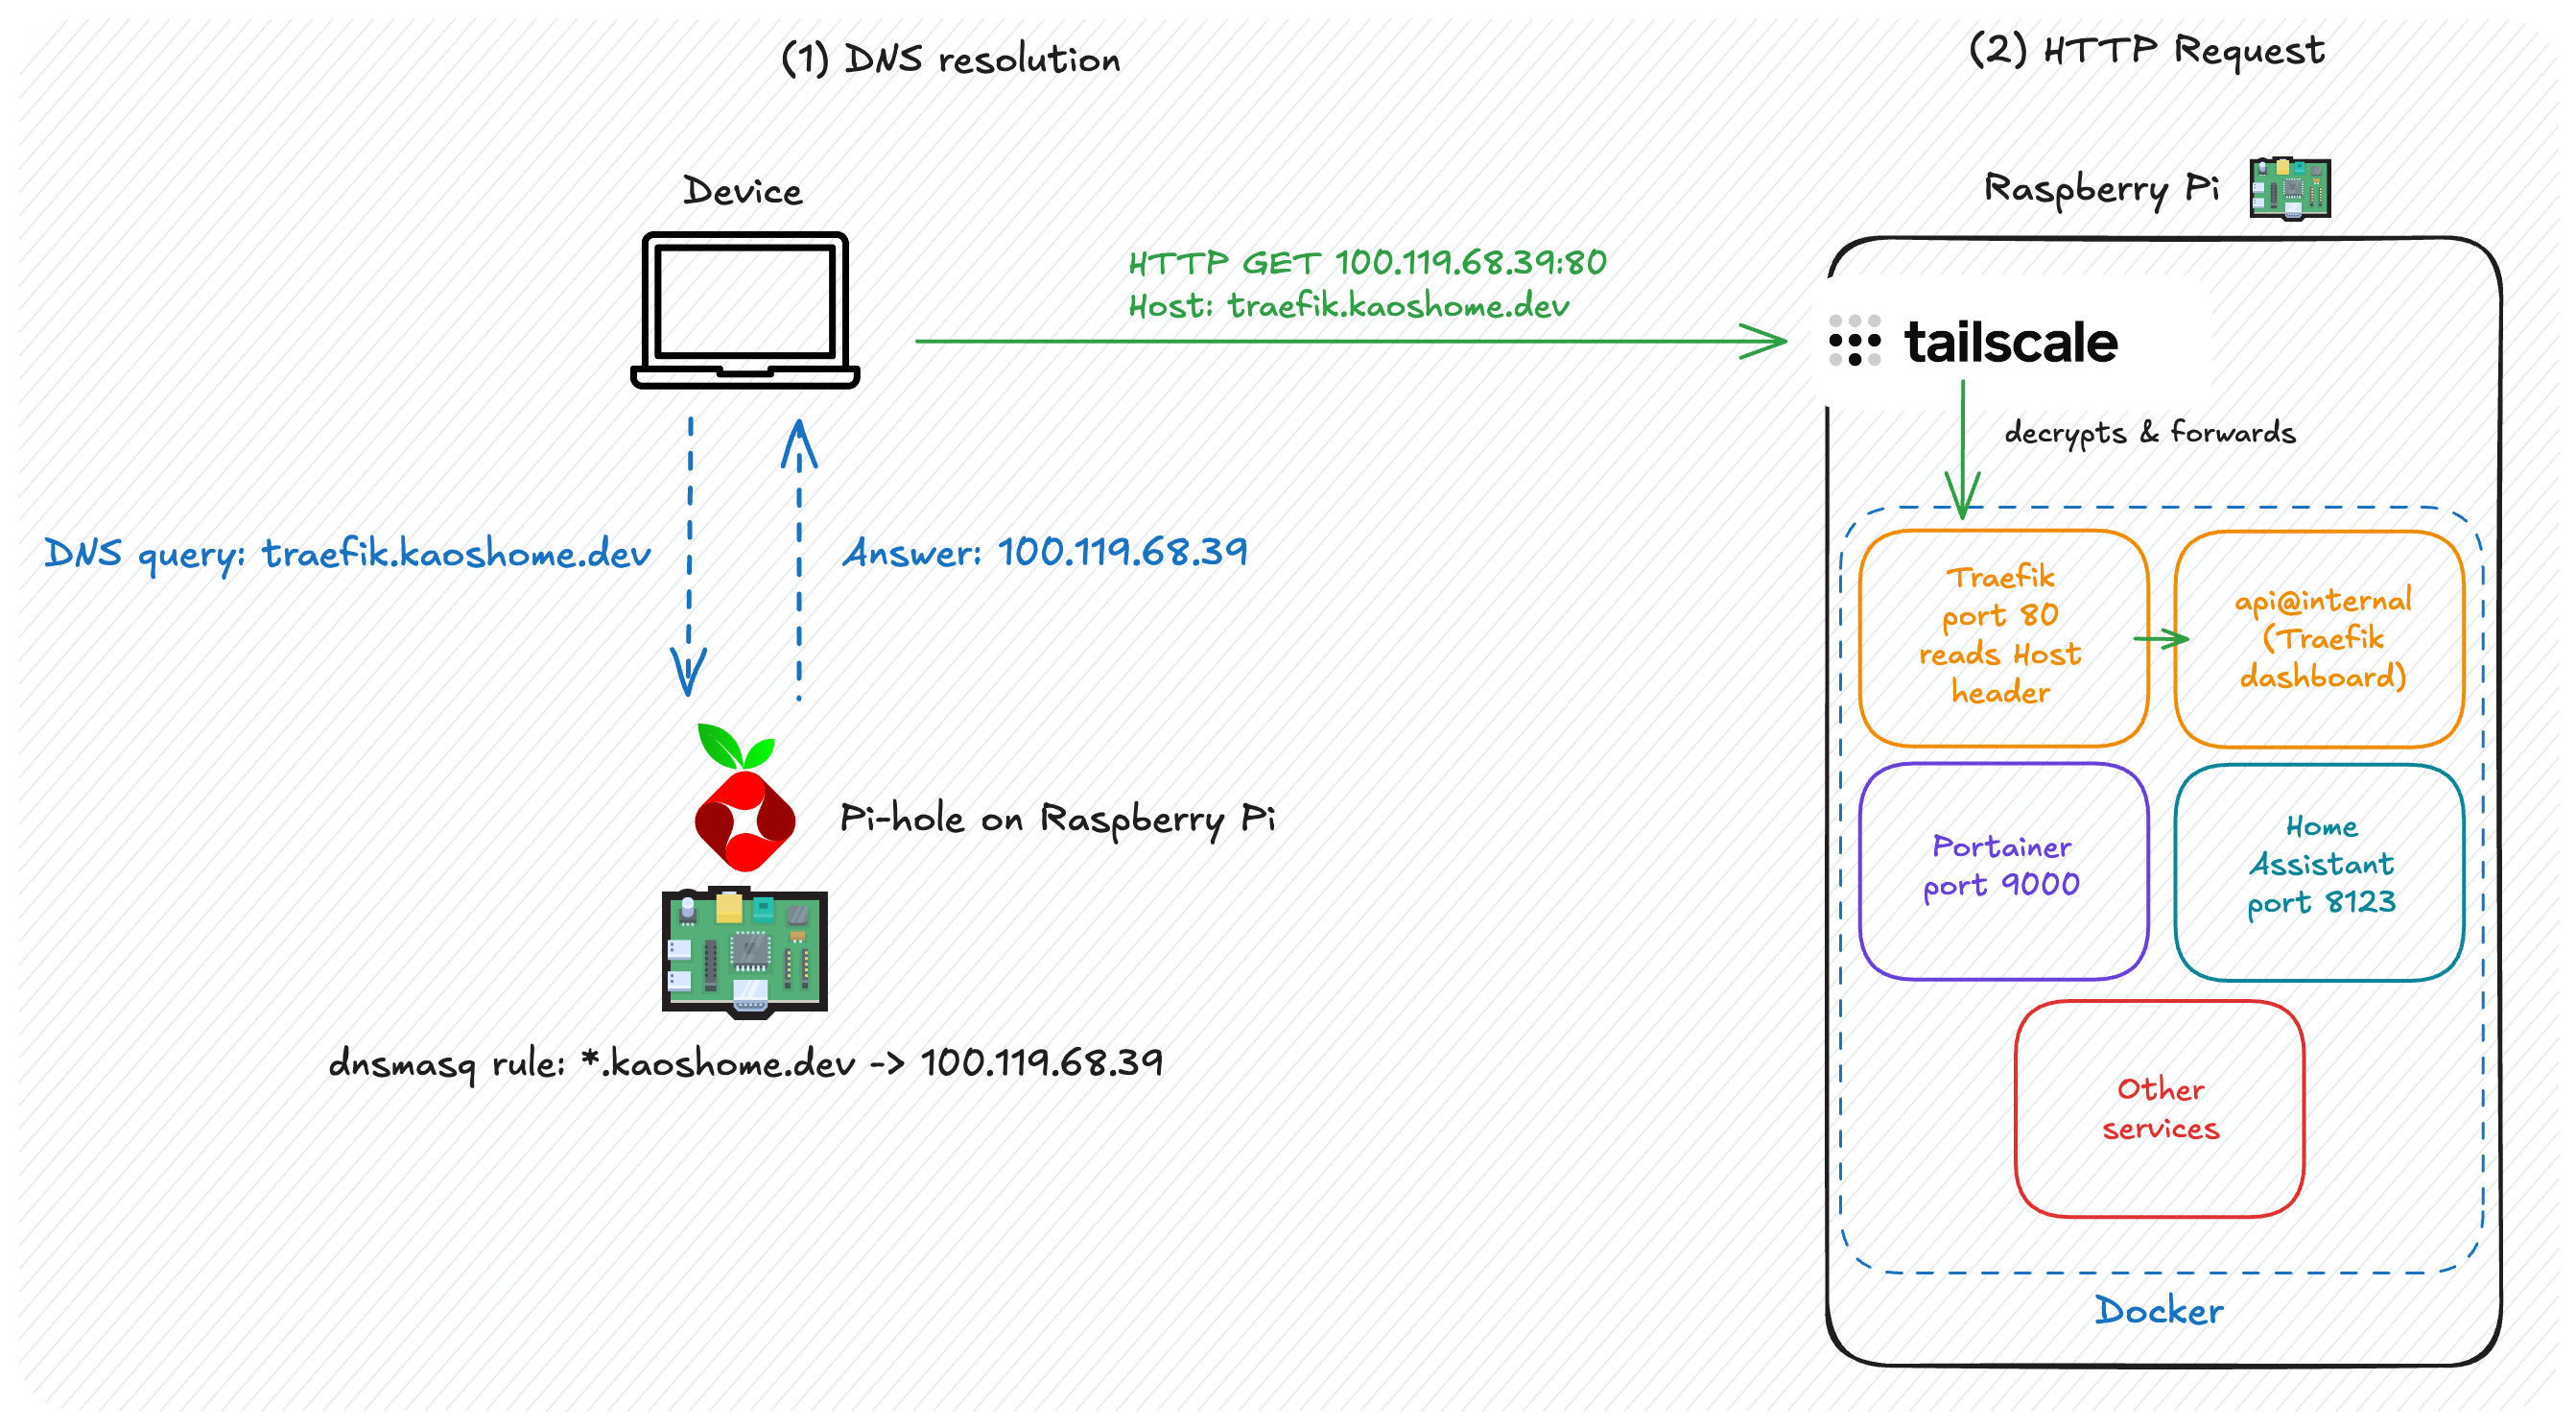
Each layer has a single responsibility. Pi-hole maps names to IPs. Tailscale delivers packets securely. Traefik reads the hostname and routes to the right container. None of them care about what the others are doing.
Where we are
With Pi-hole and Traefik running:
*.kaoshome.devresolves to the Pi’s Tailscale IP on every tailnet device- All tailnet devices get network-wide ad-blocking as a bonus
- Traefik routes requests to the right container based on hostname
http://traefik.kaoshome.devis accessible from anywhere on the tailnet
No more port numbers. Adding a new service means adding a Docker Compose file for the service and writing one short YAML file in dynamic/ — no DNS changes, no router reconfiguration.
There’s one obvious gap: the browser still shows “Not secure” and everything is going over plain HTTP. In the next post, I’ll cover how to get a trusted HTTPS certificate through Let’s Encrypt and Cloudflare.