Building Network Storage on a Raspberry Pi Before Getting a NAS
Adding a 4 TB NAS drive to my Raspberry Pi as a first step towards a real NAS: choosing the hardware, setting up the disk safely, sharing it with Samba in Docker and building a recycle bin for it.
- published
- tags
- #Docker #Homelab #Self-Hosting #Raspberry-Pi #Samba #Nas #Storage #Linux
- categories
- Homelab
I’m an amateur photographer and, since I bought my camera, I’ve collected about 50 GB of RAW files, edited pictures and videos and all of it lives on my computer. That’s a problem in two ways: it takes space I’d rather use for other things and it’s one broken laptop away from being gone.
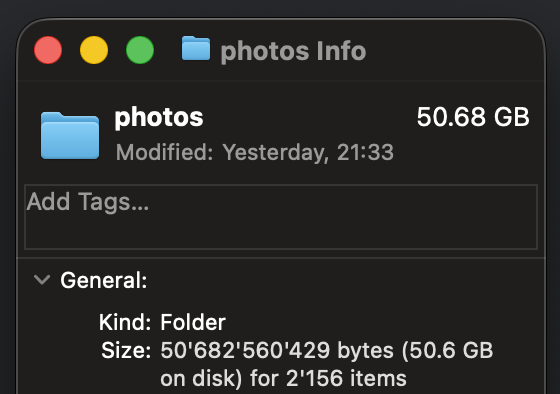
So, I wanted somewhere else to keep them. And once I started thinking about it, “somewhere for my photos” became “somewhere for anything”: documents, music, movies etc.
This was the first time I stopped to learn more in depth what a NAS (Network Attached Storage) is. After reading a bit, I realized that a proper NAS would be overkill for me, at least for now. So I decided to build an >intermediate< solution on top of the homelab I already have: something cheap that gets my foot in the door and that can grow into a proper NAS later, without throwing anything away.
Requirements #
Before buying anything, I wrote down what I needed:
- General purpose storage: not tied to one app or one type of file
- Photographer workflow: copying large folders from my Mac and opening archived files directly from desktop apps
- Part of the homelab: managed the same way as my other services, with Docker and config files in the repo
- Every device: reachable from all my devices on the tailnet (macOS, Linux, Windows and iPhone). My girlfriend should also have her own account
- Private only: reachable from my home network and my tailnet, nothing exposed to the internet
- Independent: if the disk is unplugged or dies, the rest of the homelab (Home Assistant, Pi-hole, etc.) keeps running
External drive, second Pi or NAS? #
I considered three options:
- A NAS now. A 2-bay NAS with two drives costs several hundred francs for something I don’t really need right now.
- A second Raspberry Pi as a storage server. This would keep storage separate from the services on my current Pi. But it wouldn’t make anything faster, since gigabit Ethernet is the limit either way. And it wouldn’t make my files any safer: they’d still be on one disk in one place.
- An external drive on my current Pi. It’s cheaper than a NAS and part of the hardware I already have. If I choose a drive that’s made for NAS use, it can move into a real NAS later as its first disk!
I went with the external drive. This is the plan:
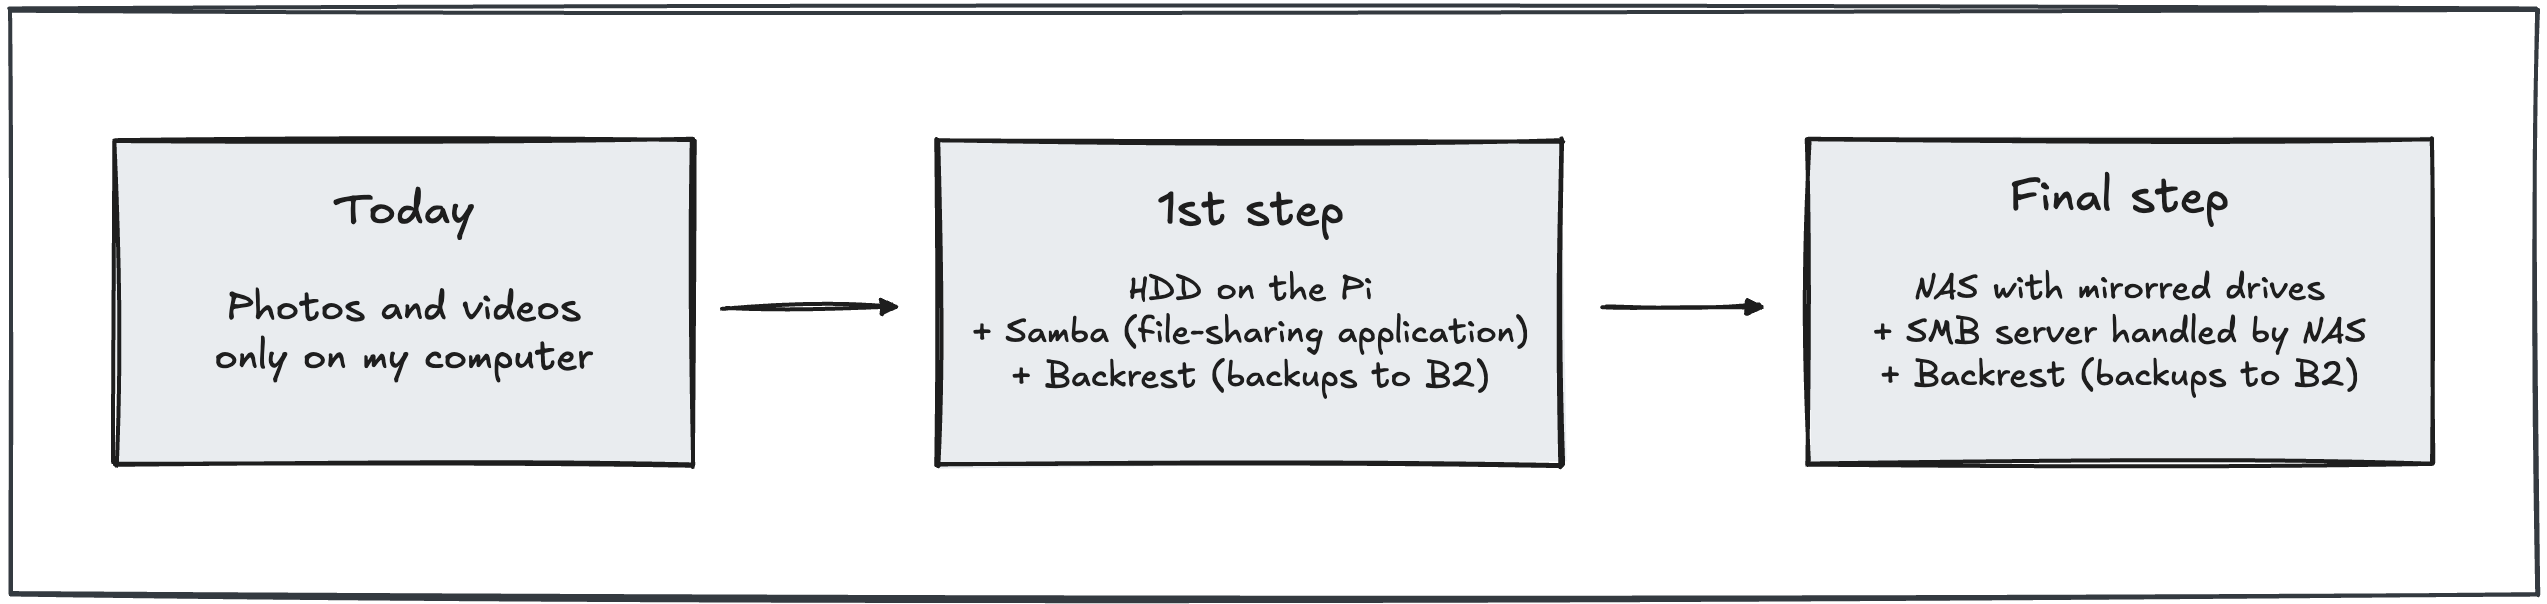
Today, everything sits on my Mac. The intermediate step is a hard drive on the Pi that I can reach as a network drive, plus an off-site backup. Later, the drive moves into a NAS together with a second one.
Is the Pi already busy? #
Before giving the Pi more work, I wanted to know how much it was already doing. My Pi is a Raspberry Pi 4 Model B with 4 GB of RAM, booting from a USB SSD. A few commands give a quick picture:
$ uptime
 10:55:20 up 12 days, 15:19,  3 users,  load average: 0.21, 0.20, 0.19
$ free -h
               total        used        free      shared  buff/cache   available
Mem:           3.7Gi       1.2Gi        82Mi        27Mi       2.5Gi       2.5Gi
$ vcgencmd measure_temp
temp=38.9'C
$ vcgencmd get_throttled
throttled=0x0
- A load average of 0.2 on 4 cores means the CPU is idle about 95% of the time
- 2.5 GB of RAM is still available
throttled=0x0means the Pi has never slowed itself down because of heat or a weak power supplyiostat -xshowed the SSD at a few percent utilization at most
docker stats was less helpful at first: every container showed 0B of memory. Raspberry Pi OS disables the memory cgroup by default, so Docker can’t measure memory per container. Adding two options to the end of /boot/firmware/cmdline.txt and rebooting fixes it:
sudo sed -i '$ s/$/ cgroup_enable=memory cgroup_memory=1/' /boot/firmware/cmdline.txt
sudo reboot
After the reboot, all twelve containers together used about 1.3 GB, with Home Assistant being the biggest at around 530 MB. A file server like Samba needs a small fraction of that, so the Pi has plenty of room.
Choosing the hardware #
My first idea was an SSD. A Samsung T7 is fast, silent and small, but 1 TB cost CHF 174. For a bit more, a hard drive gives me four times the space:
| Part | Price |
|---|---|
| WD Red Plus 4 TB | CHF 209 |
| UGREEN 3.5" USB 3.0 enclosure | CHF 27.90 |
| Total | CHF 236.90 |
That’s about CHF 59 per TB, against CHF 174 for the SSD. The SSD’s speed wouldn’t help much anyway: everything goes over the network, and gigabit Ethernet tops out around 110 MB/s, which a hard drive handles easily.
A few things decided which hard drive:
- It has to bring its own power. The USB ports on a Pi 4 share about 1.2 A, and my boot SSD already uses part of that. Portable 2.5" hard drives draw all their power from USB, and the current spike when they spin up is a classic cause of disconnects and corrupted file systems. A 3.5" drive in an enclosure with its own 12 V adapter avoids the problem.
- It should be a NAS drive. Drives like the WD Red Plus or Seagate IronWolf are built to run 24/7 and use CMR. The alternative, SMR, is slower when rewriting data and a bad fit for the RAID setups a NAS uses. The two models are practically the same for my use, so I took the WD. Check out this article for the differences between CMR and SMR.
- It can move into the NAS later. A 3.5" drive goes straight into a NAS bay. I can then use the enclosure case for a backup disk.
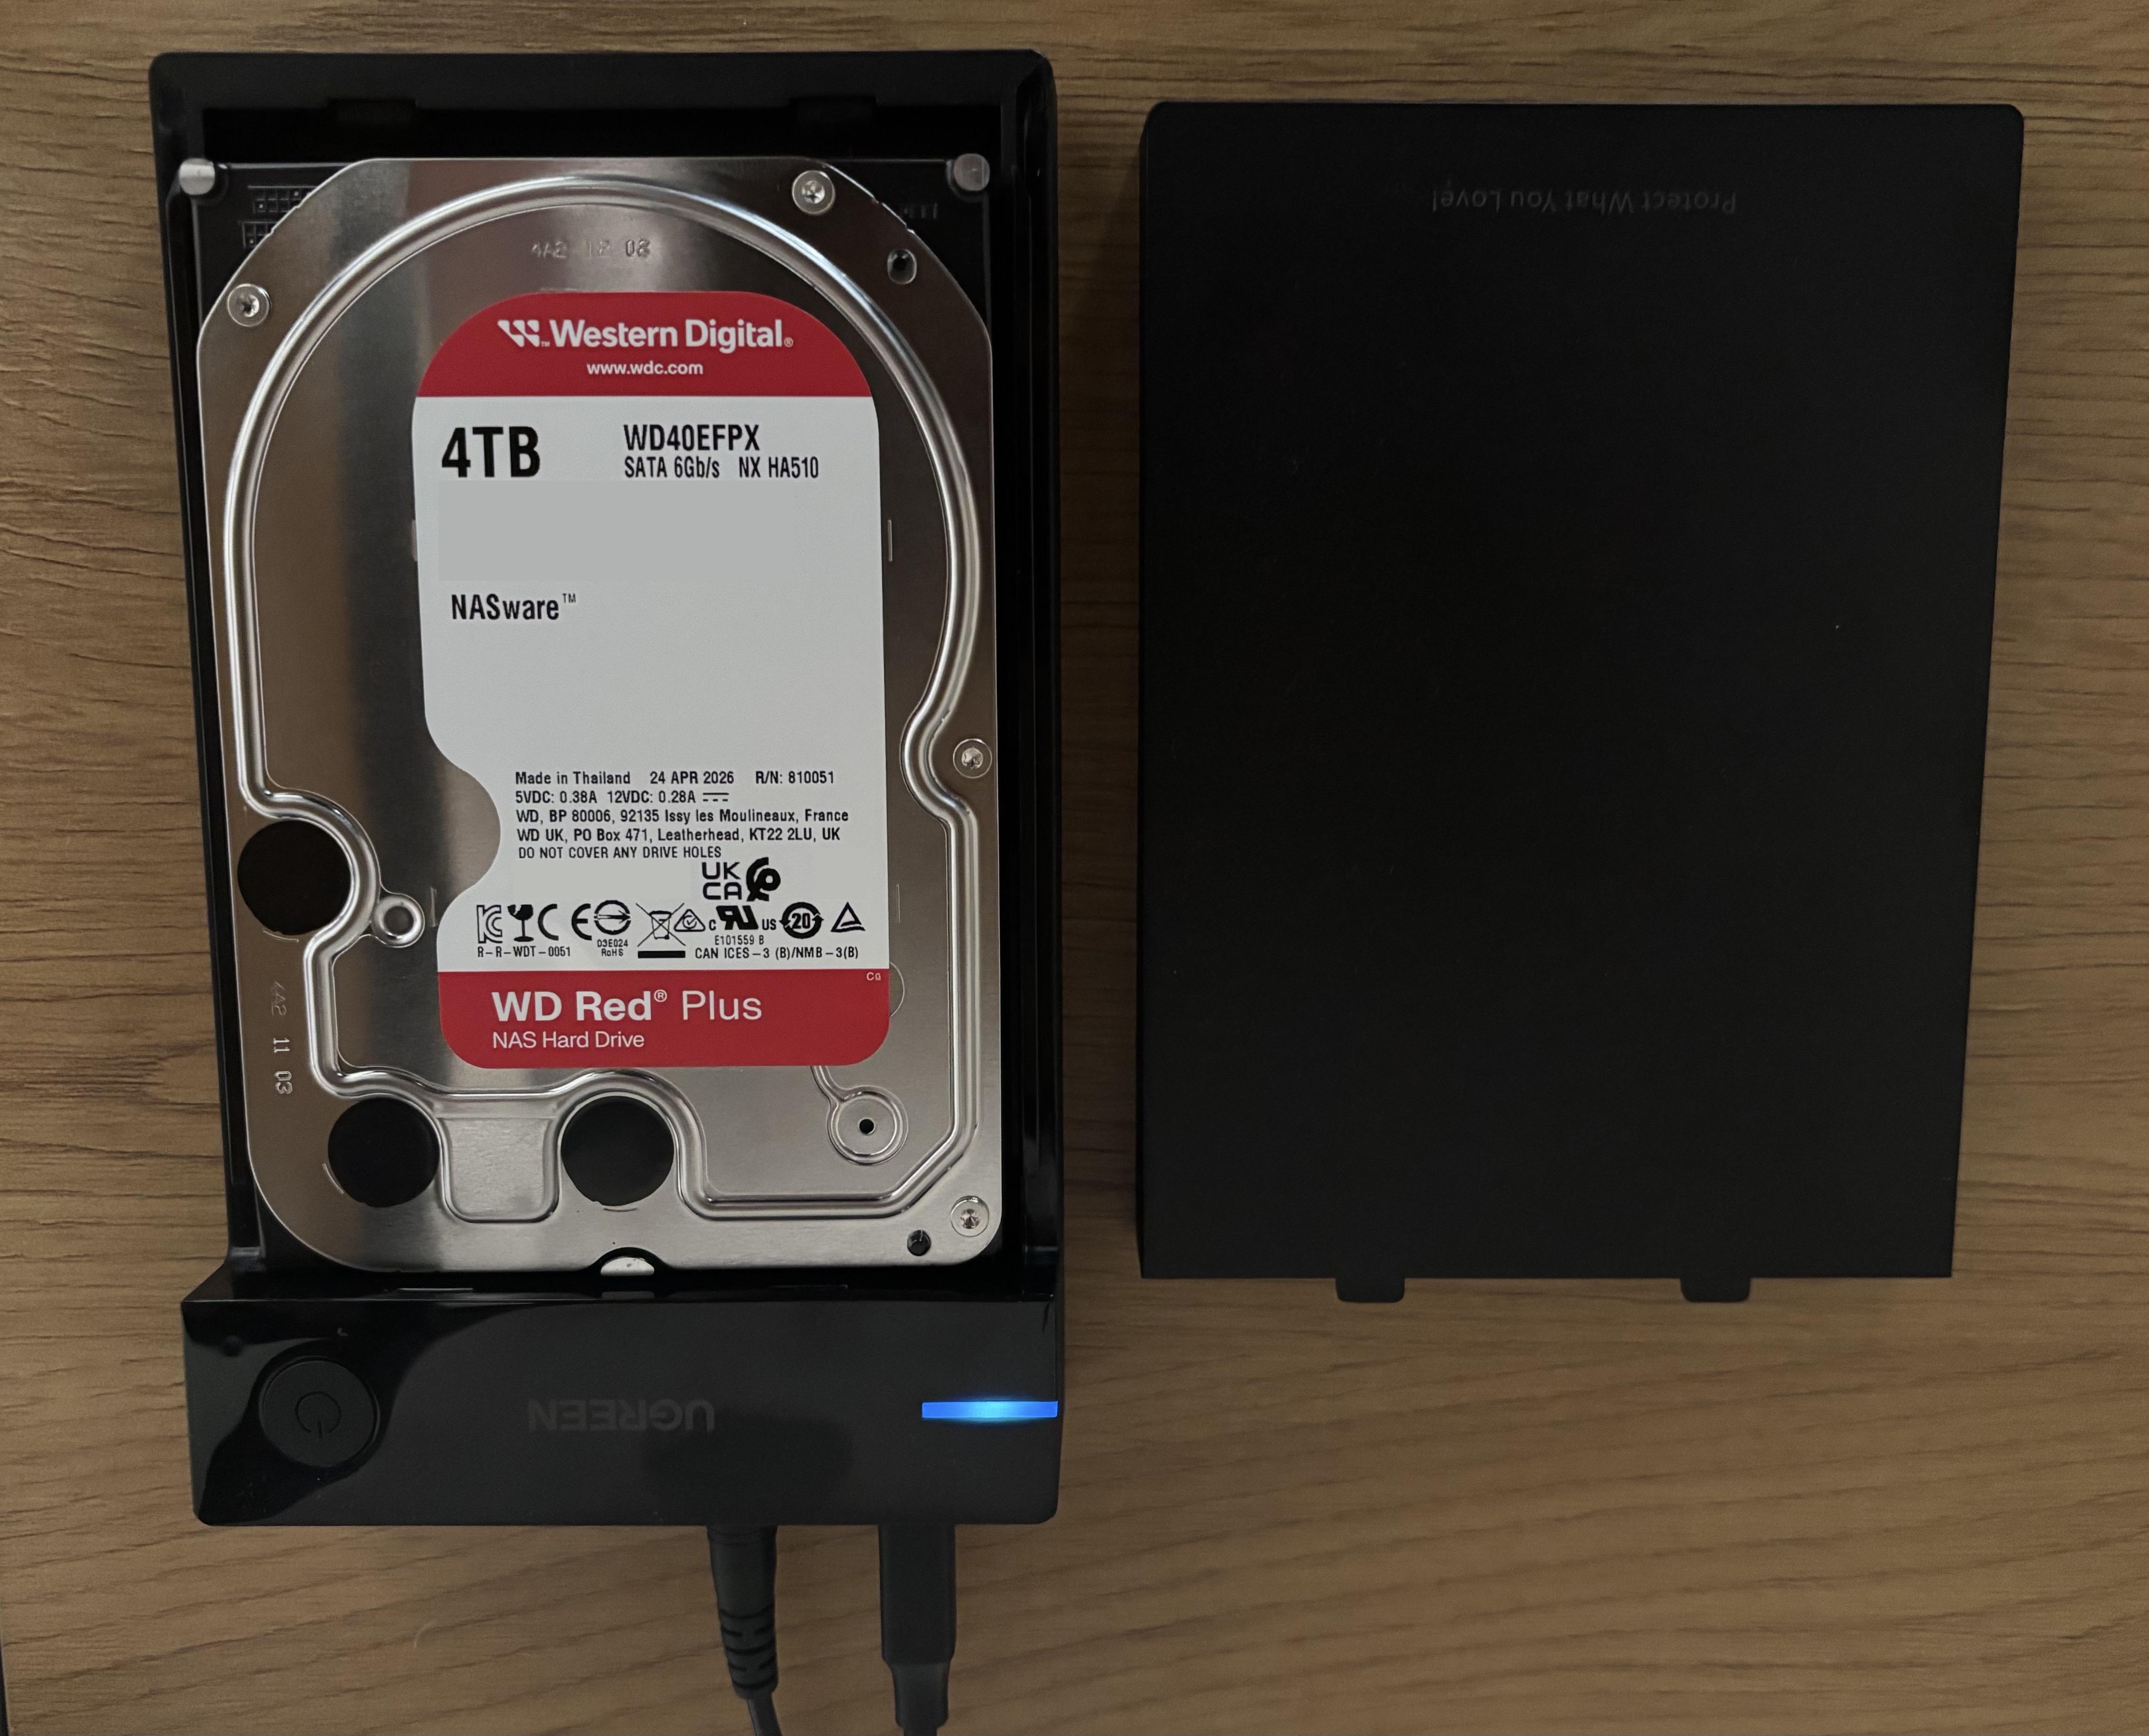
After plugging the enclosure into one of the Pi’s blue USB 3 ports, lsusb -t confirms that it runs in UAS mode, the faster of the two USB storage protocols:
|__ Port 2: Dev 3, If 0, Class=Mass Storage, Driver=uas, 5000M
Setting up the disk #
I want one partition with an
ext4
file system, mounted at /mnt/storage on every boot, without the rest of the homelab depending on it. In total, we have 6 steps to complete:
- Identify the disk
- Check its health
- Partition and format it
- Mount it on every boot
- Create the folders and set the owner
- Protect the mount point
1. Identify the disk #
$ lsblk -o NAME,SIZE,MODEL,TRAN,FSTYPE,MOUNTPOINTS
NAME      SIZE MODEL                 TRAN FSTYPE MOUNTPOINTS
sda     447.1G KINGSTON SA400S37480G usb
├─sda1    512M                            vfat   /boot/firmware
└─sda2  446.6G                            ext4   /
sdb       3.6T WDC WD40EFPX-68C6CN0  usb
The new drive is sdb. But I don’t want to rely on that name: my boot disk is also a USB disk, and names like sda and sdb can swap between boots. Formatting the wrong one would wipe the Pi. So for everything that follows, I use the drive’s stable name from /dev/disk/by-id/, which contains its model and serial number:
DISK=/dev/disk/by-id/ata-WDC_WD40EFPX-68C6CN0_<serial>
2. Check its health #
Hard drives keep health statistics called
SMART
, and smartctl reads them. Behind the USB enclosure it first refused with Unknown USB bridge, so it has to be told that the drive behind the bridge speaks SATA (-d sat):
sudo apt install -y smartmontools
sudo smartctl -d sat -H -A "$DISK"     # overall health and attributes
sudo smartctl -d sat -t short "$DISK"  # 2-minute self-test
The overall result was PASSED. These are the attributes worth looking at (trimmed):
ID# ATTRIBUTE_NAME          RAW_VALUE
  5 Reallocated_Sector_Ct   0
  9 Power_On_Hours          186
194 Temperature_Celsius     26
197 Current_Pending_Sector  0
198 Offline_Uncorrectable   0
199 UDMA_CRC_Error_Count    0
No reallocated, pending or uncorrectable sectors means no bad spots on the disk. No CRC errors means the cable and the enclosure are fine. It shows 186 power-on hours because I had plugged it in about 8 days earlier. The short self-test passed too.
3. Partition and format #
sudo apt install -y parted
sudo parted --script "$DISK" mklabel gpt mkpart storage ext4 1MiB 100%
sudo partprobe "$DISK"
sudo mkfs.ext4 -L storage -m 0 -i 65536 "${DISK}-part1"
parted creates a
GPT partition table
with one partition over the whole disk. Starting at 1 MiB keeps the partition aligned with the drive’s 4 KB sectors.
Let me give a bit more info on the two mkfs.ext4 options:
-m 0: by default, ext4 reserves 5% of the disk for the root user, so that a full disk can’t lock up the system. That makes sense on a system disk. On a 4 TB data disk, it’s 200 GB I’d never be able to use.-i 65536: one inode per 64 KB of disk. Every file needs an inode , and they’re all created when formatting. The default makes room for about 244 million files, and their tables take around 60 GB, which a disk full of photos and videos will never need. One per 64 KB still allows about 61 million files and uses a quarter of the space.
4. Mount it on every boot #
sudo mkdir -p /mnt/storage
UUID=$(sudo blkid -s UUID -o value "${DISK}-part1")
echo "UUID=$UUID  /mnt/storage  ext4  defaults,noatime,nofail,x-systemd.device-timeout=10s  0  2" | sudo tee -a /etc/fstab
sudo systemctl daemon-reload
sudo mount -a
The line in /etc/fstab refers to the partition by its UUID, which never changes. The options:
nofailandx-systemd.device-timeout=10s: if the disk is missing, the Pi waits at most 10 seconds and then boots normally. Without them, a dead USB disk could stop Home Assistant and Pi-hole from starting.noatime: don’t update a file’s access time every time it’s read, which saves pointless writes
A reboot followed by findmnt /mnt/storage confirms that the disk comes back on its own.
5. Create the folders and set the owner #
sudo chown alekspi:alekspi /mnt/storage
mkdir -p /mnt/storage/{gabriel/{documents,photos/{raw,edited,exports},videos/{raw,edited}},ayumi,media/{movies,music,tv}}
My girlfriend and I each get a personal folder, and media/ holds the movies, music and TV shows we share:
/mnt/storage
├── gabriel/   documents/, photos/, videos/
├── ayumi/
└── media/     movies/, music/, tv/
Every file on the disk belongs to my user (alekspi, UID 1000). Every container that writes to the disk will write as that same user, so a file created through one app is never “permission denied” in another.
6. Protect the mount point #
nofail creates a subtle problem. If the disk is missing at boot, /mnt/storage still exists: it’s an empty folder on the boot SSD. Samba would accept files into it, and I could end up copying 50 GB of photos onto the Pi’s system disk without noticing.
The fix is to make that empty folder immutable while the disk isn’t mounted:
sudo umount /mnt/storage
sudo chattr +i /mnt/storage
sudo mount /mnt/storage
The flag sits on the folder underneath the mount, not on the disk. With the disk mounted, everything works as usual. Without it, every write fails with an error instead of silently filling up the SSD.
How to reach the files: Samba vs a web UI #
There are two common ways to make files on a server available:
- A network drive (Samba). The disk shows up in Finder, Windows Explorer or the iPhone Files app, just like a USB stick would. Large copies are fast and reliable and most apps can open files directly.
- A web file manager. A website where you browse, preview, upload and download files from any browser. Useful for quick access from a phone or for showing files to another person, but uploading 50 GB of RAWs through a browser tab is slow and fragile.
The best-known web file manager, File Browser , was archived on 2026-08-31 with some security issues still open. Its fork, FileBrowser Quantum , is actively developed and is what I’d use if I ever want a web UI.
I thought about it and, for now, I don’t think I need one. My computer and phone can connect to a Samba share easily, so I started with >Samba only<.
Samba in Docker #
SMB #
Samba is an open-source software implementation of the SMB (Server Message Block) protocol. SMB is a network protocol that allows computers to access resources, such as files, directories, printers and other shared services, on another computer over a network. It is generally classified as an Application Layer (Layer 7) protocol in the OSI model, although some of its functionality overlaps with other layers.
While SMB defines how clients and servers communicate, Samba implements the protocol, allowing Unix-like systems such as Linux to provide SMB shares. An SMB client is the software that connects to these shares. Luckily, macOS already has one built in!
There are alternatives to SMB, including NFS (Network File System), SFTP (SSH File Transfer Protocol) and WebDAV (Web Distributed Authoring and Versioning). Each has its own strengths and use cases, but one of SMB’s main advantages is its compatibility across operating systems. For me, the deciding factor was my “every device” requirement: SMB is the only one of these that macOS, Windows, Linux and the iPhone Files app all support out of the box.
You can read more about different file-sharing protocols here .
The compose file #
Samba runs in Docker like my other services, using the ServerContainers/samba image. This is the whole compose file:
services:
  samba:
    image: ghcr.io/servercontainers/samba:smbd-only-latest
    container_name: samba
    restart: unless-stopped
    # SMB isn't HTTP, so it doesn't go through Traefik: listen on the Pi's port 445 directly
    network_mode: host
    # Accounts (ACCOUNT_*, UID_*, GROUPS_*) live in .env so usernames and passwords stay out of git
    env_file: .env
    environment:
      FAIL_FAST: 1
      GROUP_smbusers: 1500
      # Only the home LAN and the tailnet (IPv4 and IPv6) may connect
      SAMBA_GLOBAL_STANZA: >-
        hosts allow = 127.0.0.1 192.168.178.0/24 100.64.0.0/10 fd7a:115c:a1e0::/48;
        server min protocol = SMB3
      # Every user is written to disk as alekspi (UID 1000), so file ownership stays consistent.
      # Deleted files go to .recycle/<username>/ instead of disappearing (SMB has no Trash).
      SAMBA_VOLUME_CONFIG_storage: >-
        [storage];
        path = /shares/storage;
        valid users = @smbusers;
        guest ok = no;
        read only = no;
        browseable = yes;
        force user = alekspi;
        create mask = 0664;
        directory mask = 0775;
        vfs objects = catia fruit streams_xattr recycle;
        recycle:repository = .recycle/%U;
        recycle:keeptree = yes;
        recycle:versions = yes;
        recycle:touch = yes;
        recycle:directory_mode = 0775;
        recycle:exclude = ._*,.DS_Store
    volumes:
      - /mnt/storage:/shares/storage
Not behind Traefik #
All my other services sit behind Traefik, following the pattern I describe in a previous post called
“A Repeatable Pattern for Adding New Docker Services Behind Traefik”
. Traefik is a reverse proxy for HTTP: it receives requests on port 443, reads the hostname and forwards them to the right container. SMB isn’t HTTP and uses port 445, so Traefik can’t route it. Instead, the container uses network_mode: host and listens directly on the Pi’s port 445.
The custom domain still works, though. In my post called
“Custom Local Subdomains for Docker Services with Pi-hole and Traefik”
I set up Pi-hole to resolve every *.kaoshome.dev name to the Pi’s Tailscale IP. So smb://storage.kaoshome.dev/storage resolves to 100.119.68.39, and the connection goes straight to Samba on port 445. Samba doesn’t look at the name at all. storage is just a name I picked, and any *.kaoshome.dev name would work the same way.
Who can connect #
My router doesn’t forward anything to the Pi, so Samba can’t be reached from the internet. hosts allow is a second lock in case that ever changes, for example through IPv6 or a router setting I forget about. It only accepts:
192.168.178.0/24: my home network100.64.0.0/10andfd7a:115c:a1e0::/48: my tailnet (IPv4 and IPv6)
It doesn’t protect against devices on my own network, since they all have addresses in that range. That’s what the login is for. server min protocol = SMB3 also turns off the older/less secure versions of the protocol.
No SMB encryption #
SMB3 can encrypt traffic and I >deliberately< left that off. The Pi 4’s processor has no hardware acceleration for AES, the cipher SMB uses, so encryption would cut transfer speeds badly. At home, I accept that trade-off. When I’m away, Tailscale already encrypts everything with WireGuard, which uses a cipher ( ChaCha20 ) that the Pi handles well without special hardware.
Mac compatibility and file ownership #
catia fruit streams_xattr are Samba’s macOS compatibility modules. With them, browsing in Finder is faster, and tags and other Mac metadata are kept. The recycle module at the end is for the next section.
force user = alekspi writes every file as my user, no matter who is logged in. That keeps the “one owner for every file” rule from earlier. Who can open the share is controlled by Samba instead: only members of the smbusers group.
Accounts #
The accounts live in a .env file next to the compose file. It’s in .gitignore, so usernames and passwords never end up in git:
ACCOUNT_alekspi="..."
UID_alekspi=1000
GROUPS_alekspi=smbusers

ACCOUNT_partner="..."
UID_partner=1001
GROUPS_partner=smbusers
Each person gets an account, a fixed user ID (so two accounts never fight over the same one) and membership in smbusers. The second block is for my girlfriend, so she can have her own login. FAIL_FAST in the compose file makes the container stop if an account can’t be created, instead of quietly starting without it.
After docker compose up -d, one command confirms that both accounts are in the group:
$ docker exec samba grep smbusers /etc/group
smbusers:x:1500:alekspi,partner
Connecting #
On my Mac: Finder → Go → Connect to Server (Cmd + K), then smb://192.168.178.46/storage at home or smb://storage.kaoshome.dev/storage from anywhere else. You can also do a Spotlight Search (Cmd + Space) and write smb://192.168.178.46/storage there. On the iPhone, the Files app has the same “Connect to Server” option. On Windows, it’s “Map network drive” with \\192.168.178.46\storage.
A recycle bin for SMB #
SMB has no trash. When you delete a file on a network drive, Finder warns that it “will be deleted immediately” and other clients don’t even warn.
Samba’s recycle module provides a safety net. Instead of deleting a file, Samba moves it to .recycle/<username>/, keeping its original folder structure. To get something back, I open the hidden .recycle folder (Cmd + Shift + . shows hidden files in Finder) and move the file back where it was.
However, if we add this functionality we create an issue: the bin grows forever. I wanted files to stay there for 30 days and then be deleted for real. That raises a tricky question: how does a script know >when< a file was put in the bin?
mtime, atime or ctime? #
Every file on Linux has three timestamps:
- mtime (modification time): when the content last changed
- atime (access time): when the file was last read
- ctime (change time): when the file’s metadata last changed, for example when it was renamed, moved or had its permissions changed
When Samba moves a file into the bin, it’s a rename on the same disk. The content doesn’t change, so the mtime stays what it was. A photo I took in 2015 and delete today still has an mtime from 2015. A cleanup script based on mtime would delete it on its very next run.
The one-liner I wrote first uses atime instead (find .recycle -atime +30 -delete). It relies on Samba’s recycle:touch option, which sets the access time to “now” when a file goes into the bin. That works, but only as long as that option is there and does its job. If it’s ever missing, deleted files keep their old access times, and the oldest files disappear first. The bin would protect nothing.
ctime doesn’t depend on anything. The Linux kernel updates it automatically on every rename, and regular programs can’t set it to a different value. So when Samba moves a file into the bin, its ctime becomes the moment it was deleted. Nothing touches the file after that, so the ctime stays put. That makes ctime the most reliable “deleted at” timestamp I can get.
I checked this on the Pi by deleting a file from Finder and looking at its ctime, which stat shows as %z. It showed the time I had just deleted it:
stat -c '%z %n' /mnt/storage/.recycle/alekspi/<file>
The cleanup script #
#!/usr/bin/env bash
# Permanently deletes files that have been in Samba's recycle bin for more than RETENTION_DAYS.
# Runs daily from alekspi's crontab (see README.md). Results go to the system log:
#   journalctl -t recycle-cleanup
set -uo pipefail

STORAGE=/mnt/storage
RECYCLE="$STORAGE/.recycle"
RETENTION_DAYS="${RETENTION_DAYS:-30}"

# Disk not mounted: nothing to clean
mountpoint -q "$STORAGE" || exit 0
[ -d "$RECYCLE" ] || exit 0

# Age is measured by ctime, which is set when Samba moves the file into the bin.
# atime/mtime would be the file's original times, so old files would be deleted right away.
deleted=$(find "$RECYCLE" -type f -ctime +"$RETENTION_DAYS" -delete -printf '.' | wc -c)

# Remove folders emptied by the step above, but keep each user's .recycle/<username>/
find "$RECYCLE" -mindepth 2 -type d -empty -delete

logger -t recycle-cleanup "deleted $deleted file(s) older than $RETENTION_DAYS days"
The script does nothing if the disk isn’t mounted. Otherwise, it deletes every file whose ctime is older than 30 days, removes the folders that became empty (but keeps each user’s own folder) and writes how many files it deleted to the system log.
Testing a 30-day rule without waiting 30 days is a bit weird. I ran the script in a container with
faketime
, a tool that makes a program believe it’s a different date:
| Scenario | Result |
|---|---|
| A photo with a 2015 timestamp, deleted today | Kept |
| 29 days after deletion | Nothing deleted |
| 40 days after deletion | Files deleted, empty folders removed, user folders kept |
| Disk not mounted | Nothing touched |
A cron job runs it every night at 04:00:
0 4 * * * /home/alekspi/kaos/samba/recycle-cleanup.sh
journalctl -t recycle-cleanup shows what it deleted over time.
How fast is it? #
To measure the upload speed from my Mac, I wrote a 2 GB file of zeros to the share with dd:
dd if=/dev/zero of=/Volumes/storage/speedtest bs=1m count=2000
/dev/zero produces zeros for free, so the time it takes is all network, Samba and disk. I ran it twice, once through each address:
| Connection | Time | Speed |
|---|---|---|
LAN (192.168.178.46) | 83 s | 25 MB/s |
Tailscale (storage.kaoshome.dev) | 207 s | 10 MB/s |
The LAN was much faster, but 25 MB/s still seemed low for gigabit Ethernet, which tops out around 110 MB/s. To find the bottleneck, I measured the raw network speed between my Mac and the Pi with iperf3, with no Samba or disk involved:
$ iperf3 -c 192.168.178.46
...
[ ID] Interval           Transfer     Bitrate         Retr
[  5]   0.00-10.00  sec   276 MBytes   232 Mbits/sec   52             sender
[  5]   0.00-10.01  sec   276 MBytes   231 Mbits/sec                  receiver
231 Mbit/s is about 29 MB/s, so Samba gets about 87% of what the network can carry. The Pi, the enclosure and the disk are keeping up fine. The bottleneck is my Mac’s >Wi-Fi<. With an Ethernet cable, it should be several times faster.
For Tailscale, tailscale ping showed a direct connection over my home network, not one through Tailscale’s relay servers:
$ tailscale ping 100.119.68.39
pong from kaos (100.119.68.39) via 192.168.178.46:41641 in 4ms
So the gap between 25 and 10 MB/s is the cost of the Pi encrypting every byte for WireGuard.
In practice, I use the LAN IP at home, especially for large copies, and the Tailscale name only when I’m away. At 25 MB/s, my 50 GB take a bit over half an hour to copy.
Dashboard #
My homelab dashboard has a new Storage column with two Samba cards. Both open the same share in Finder, just through different addresses:
- Samba (LAN) uses
smb://192.168.178.46/storage. It’s the faster one, but it only works when I’m at home - Samba (VPN) uses
smb://storage.kaoshome.dev/storage. It goes through Tailscale, so it’s slower, but it works from anywhere
This makes the result of the speed test easy to follow: at home I click the LAN card, everywhere else the VPN one. Since the LAN card points to a fixed IP, I also told my router to always give the Pi the same address.
The column also has a card for Backrest, which is the topic of the next post.
Where we are #
- A 4 TB NAS drive is connected to the Pi and mounted at
/mnt/storage, and the rest of the homelab doesn’t depend on it - Samba shares it with every device on my tailnet, and my girlfriend has her own account
- Deleted files stay in a recycle bin for 30 days
- My 50 GB of photos and videos are on the disk
But there’s still something that worries me a bit: once I delete the photos from my computer to free up space, this disk becomes the >only copy<. If it dies, gets stolen, or ransomware on one of my devices encrypts the share, everything is gone, and the recycle bin won’t help with any of that. In the next post, I’ll set up nightly encrypted backups to Backblaze B2 with Backrest.
References #
- Thomas Krenn - SMART tests with smartctl: https://www.thomas-krenn.com/en/wiki/SMART_tests_with_smartctl
- NAS Compares - Seagate Ironwolf vs WD Red: https://nascompares.com/guide/seagate-ironwolf-vs-wd-red-which-is-best-in-2025-2026/
- Reichelt - SMR vs CMR: https://www.reichelt.com/magazin/en/guide/smr-cmr-which-hard-drive-is-best-for-which-purpose/
- HP - GPT Partition: What It Is, How It Works, and When to Use It: https://www.hp.com/gb-en/shop/tech-insights/gpt-partition
- Sarthak Mali - SMB Protocol: https://medium.com/@sarthakmali0710/smb-server-message-block-protocol-complete-analysis-and-enumeration-guide-7c961c8ddbf2
- WebAsha - Which protocols are used for file sharing: https://www.webasha.com/blog/which-protocols-are-used-for-file-sharing-guide-to-ftp-sftp-smb-and-more
- Unix Tutorial - atime, ctime and mtime in Unix filesystems: https://www.unixtutorial.org/atime-ctime-mtime-in-unix-filesystems/